
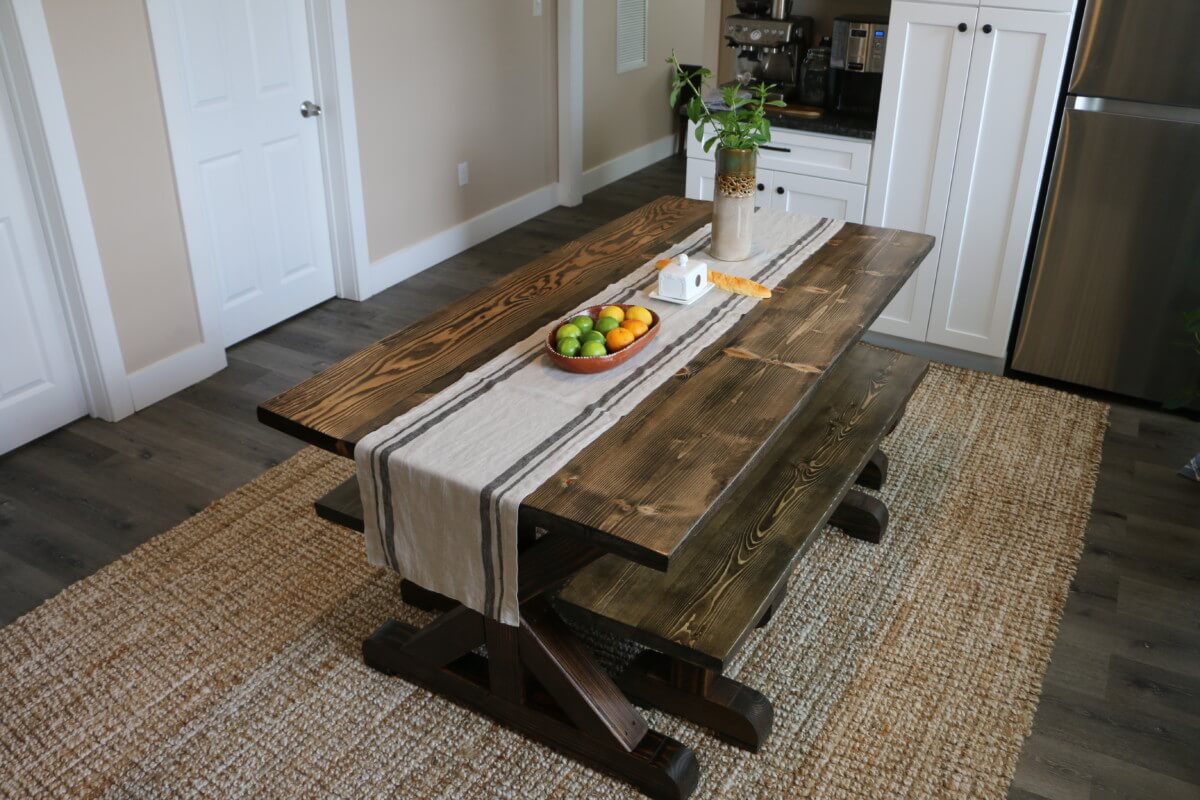
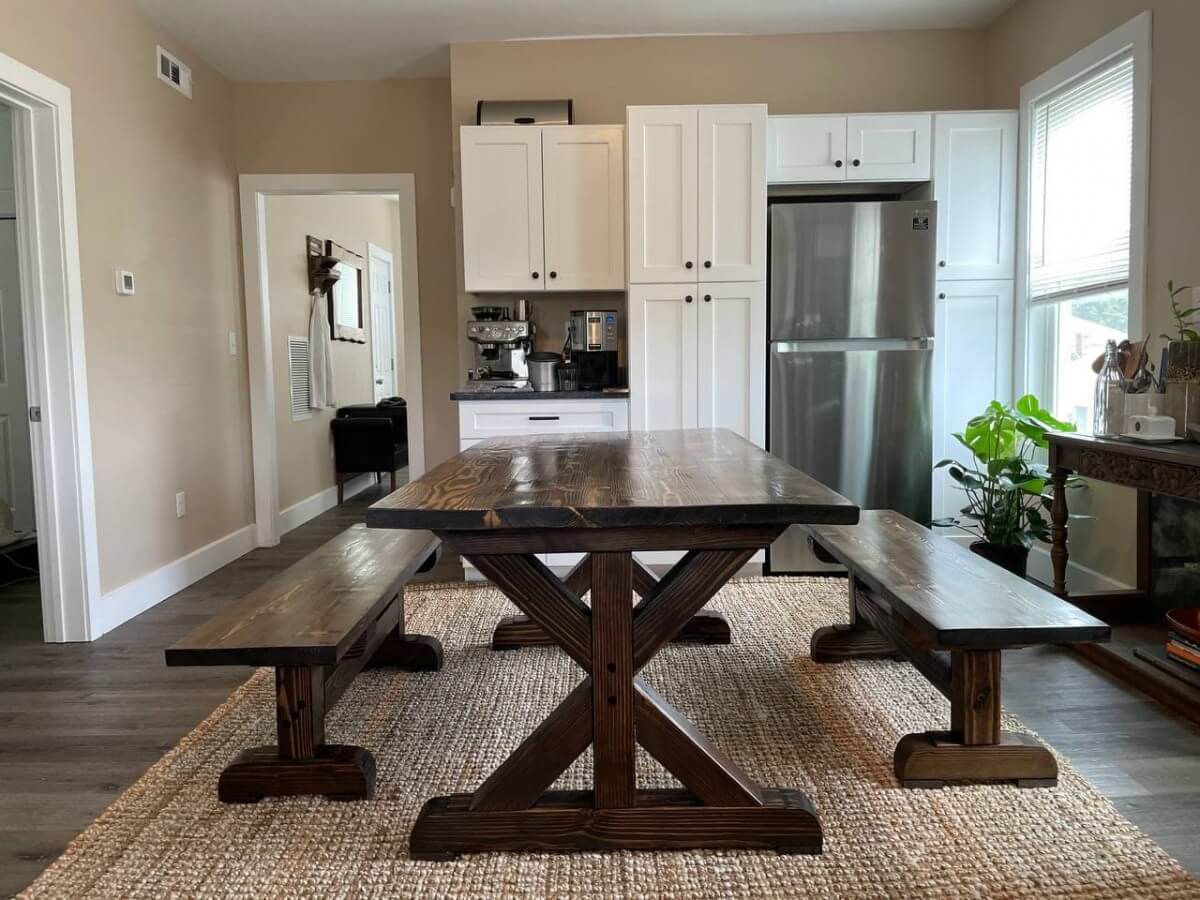
Save money and build your own farmhouse dining table and benches from dimensional lumber. Easy to follow detailed plans. This build is focused on simplicity and efficiency, while still producing a sturdy table that will last a lifetime. Farmhouse dining table and chair sets can easily set you back over $1,000. This sturdy and functional kitchen table fits 4 people easily on the benches, with extra space for two at each end of the table if you add spare chairs. This dining room table is about 6 feet long by 36″ wide, not including the benches, which nest under the table to save room. This is the perfect DIY woodworking project that will save you money, and doesn’t require tons of tools (planer & jointer help but aren’t necessary).
This beautiful rustic trestle table can be built with pine lumber found easily at local big hardware stores and can be customized to nearly any length or width. You can also choose to stain or paint the table any color you’d like.
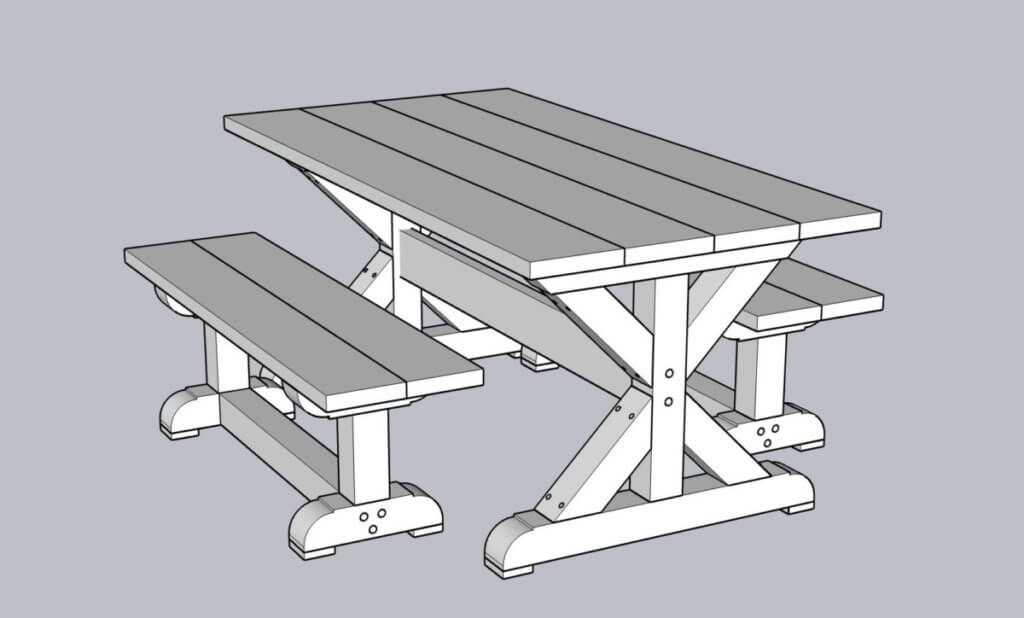
See my detailed plans, which include a lumber cut list, detailed step-by-step instructions with 3D models.
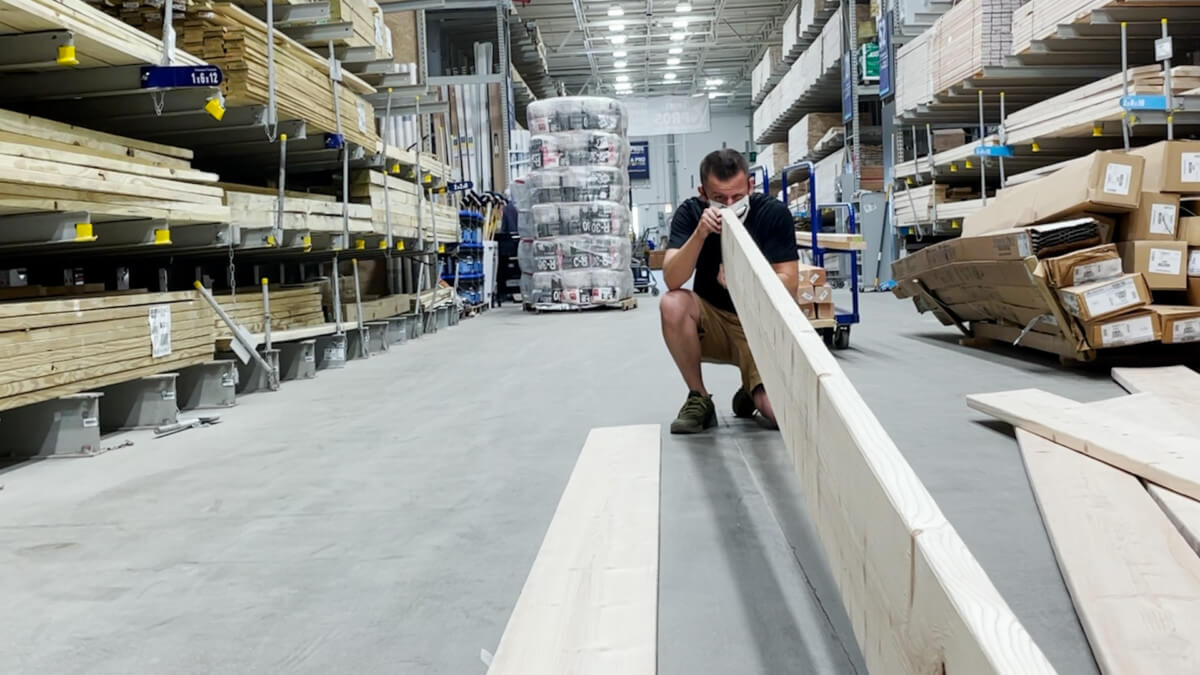
Select your lumber
The first step is to select your lumber. All the wood needed to craft your farmhouse dining table and benches can be found at your local big box hardware store. You’ll need a bunch of 4×4’s for the trestle table and bench supports, 2×10’s for the table top, 2×8’s for the bench tops and some smaller boards for the cross supports and feet.
Inspect each board, ensuring that they are relatively flat and straight. This is especially true for the boards that will make up the tops of the table and benches. You want them to be as flat as possible and as imperfection free as possible. This will significantly reduce sanding time later on.
Note that for the 2×8’s, which are for the bench tops – it’s cheaper to have a 10 foot cut in half since the benches will be 4.75 feet, otherwise you’d need 8x boards that are 8’)
If you are looking for the complete cut list, see my farmhouse dining table plans here. (coming soon)
Tools
Bandsaw or Jigsaw
Lumber buy list
4x Pine 2 x 10 x8’
2x Pine 2x4x8’
1x Pine 2x6x8’
6x Pine 4x4x8’
4x Pine 2x8x10’
1x Pine 1x4x8′
Make all cross and miter cuts
Set up your miter saw for crosscuts and cut all boards on the cut list to the appropriate length. I like to use a miter table and a clamped down stop block with roller supports to ensure accurate and consistent cuts. See my projects on how to build your own miter saw table and sawhorses. Here we will be making all cuts except for the boards that will be the table and benchtops.
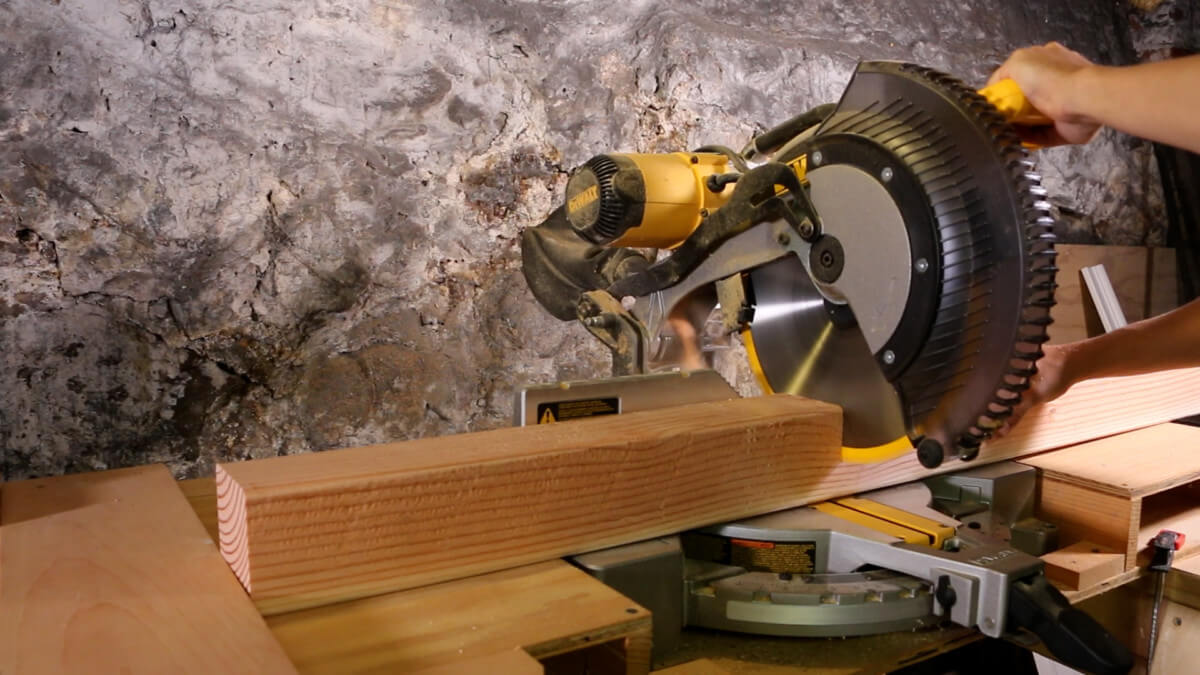
After you make all of your straight crosscuts, set up your miter saw to cut 45 degrees. Use a stop block and make all the 45 degree cuts on the trestle supports for the table

Materials
3.5” deck screws – Box
1 5/8” Wood screws – qty 48
3/8” dowels (optional)
2 1/2″ Kreg Screws – 1 box
Small metal washers that fit over the decking screws – 1 box
Sandpaper – 80, 100, 120, 150, 180 and 220 grits for the orbital
Wood Stain and Conditioner or Paint
Water Based Polyacrylic
Brush
Pre-stain wood conditioner – 1 quart
Wood Stain – 1 quart
Water Based Polyacrylic – 1 quart
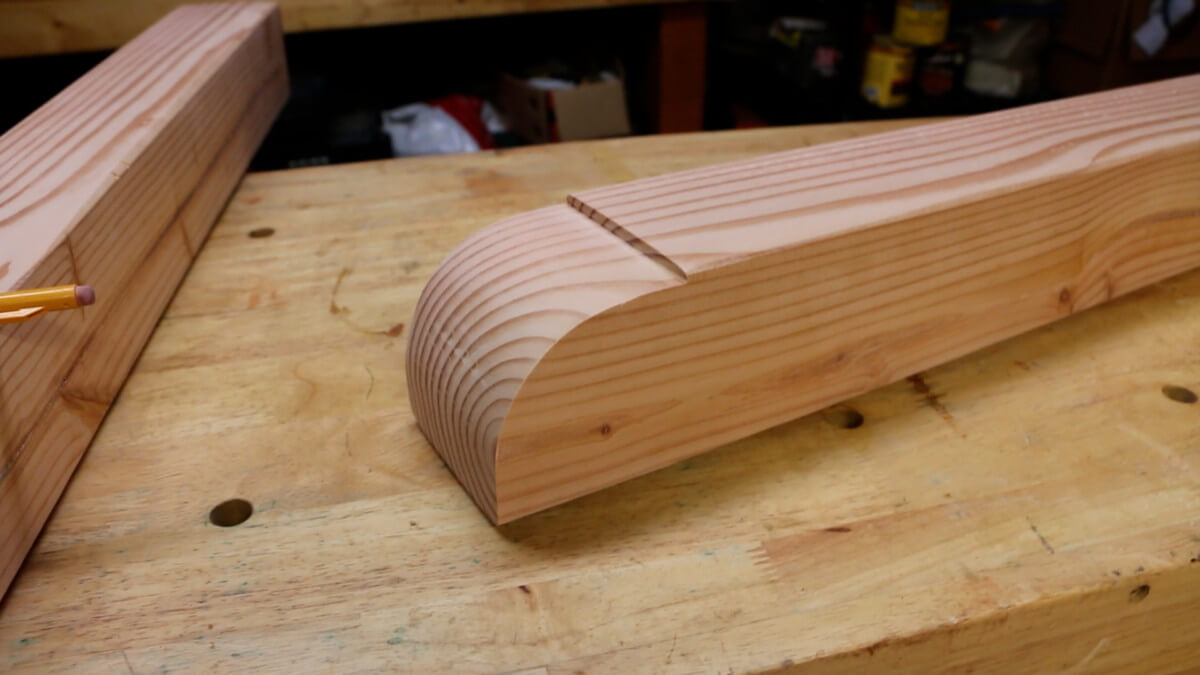
Shape the Feet
The next step is to fire up the bandsaw or jigsaw and cut out the round over design on the feet of the table and wood benches. I made a template using the curvature of a coffee can lid and traced the same pattern onto the correct side of each 4×4.
This step is completely optional. You can instead opt for a more boxy or triangular design, however I think that the round over really makes the farmhouse dining table stand out and looks more unique and home made, since I rarely have seen this design available commercially.
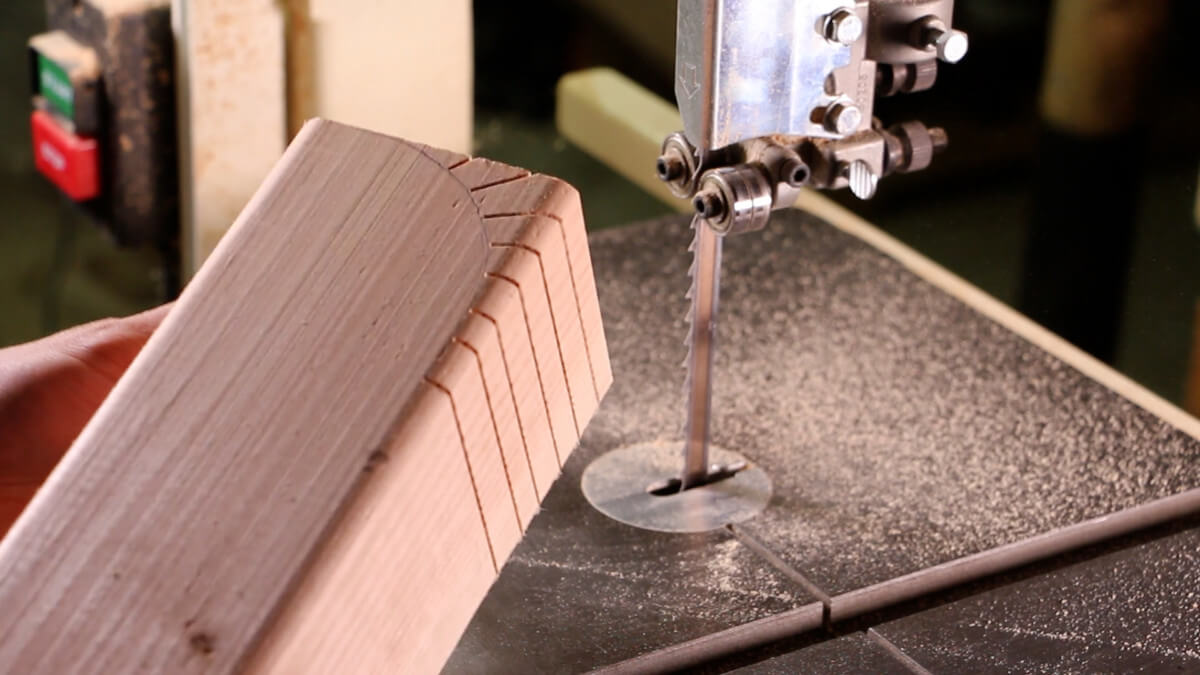
It’s important here to make relief cuts, or cuts that run perpendicular to the line you are cutting. This allows the bandsaw blade to turn without binding on the wood, which can cause burns and cuts that are not smooth.
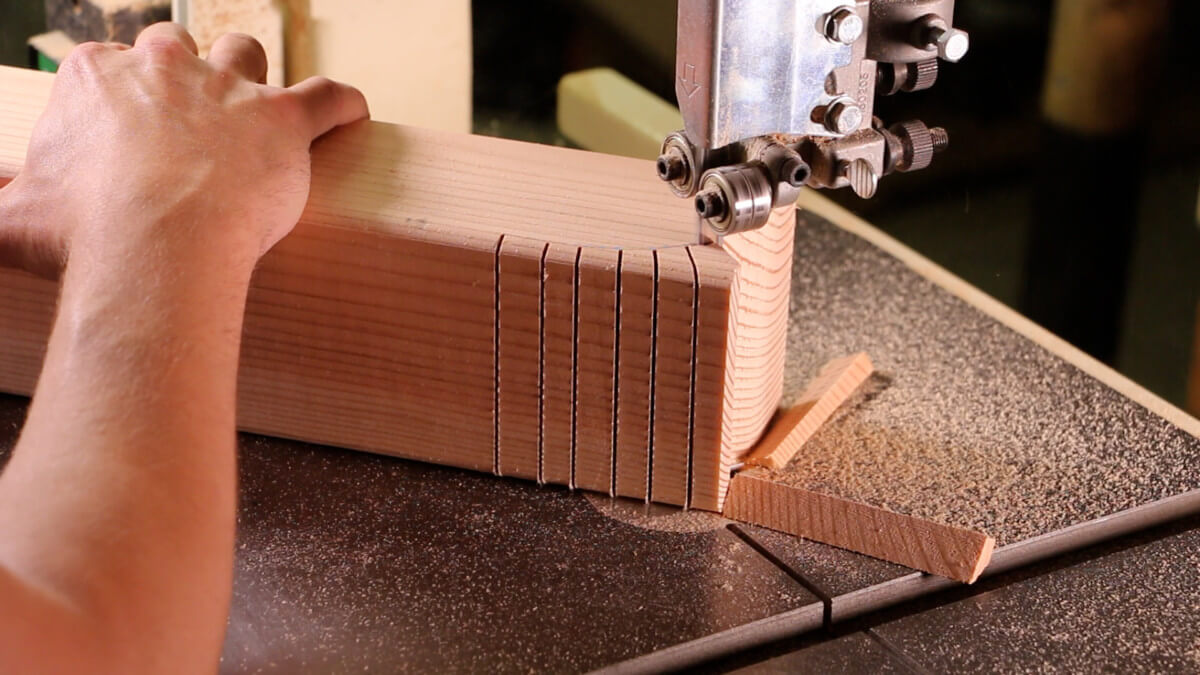
Cut with an appropriate width blade, here I am using a 3/8″ wide blade, which was a little too wide for this curve. I’d recommend going slow and making use of the relief cuts to tighten your curve if you don’t have a smaller blade.
The final product, after sanding.
Cut the Trestle Notches
Measure and trace the outline of your 2×4 for the top part of your trestle support, and then cut it out with the bandsaw. It should be tight, to strengthen the table.
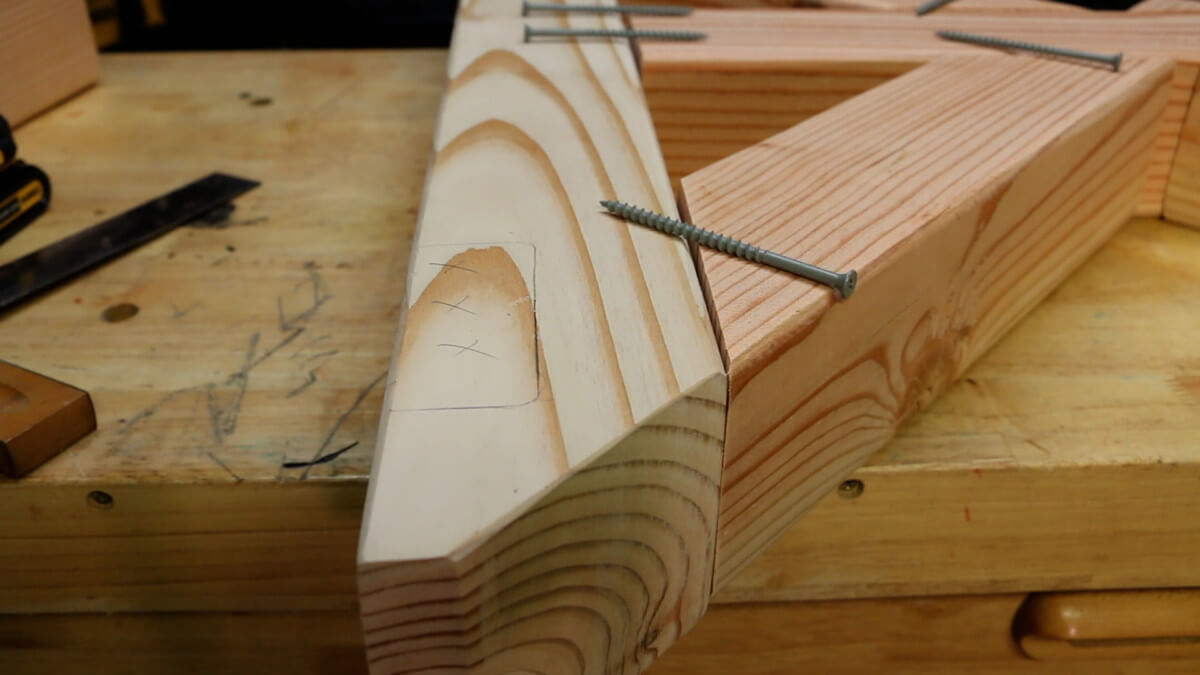
You can also cut the 45 degree angle on this board at the band saw. I recommend laying out the trestle support first and then marking your line based on how your 45 degree supports line up.

Rip the Bench and Table Tops
Take your straightest boards for the table top and orient them so that the end grain is alternating. Make sure that no boards are touching each other that have the same grain direction and this will keep the table top flat. When a board warps, it warps in the direction of its grain. Alternating the boards helps to offset this. Mark the ends of the board with a pencil to remind you.
Align the boards so that they lay as flat as possible, and any imperfections on the board are oriented so that they will be on the bottom.
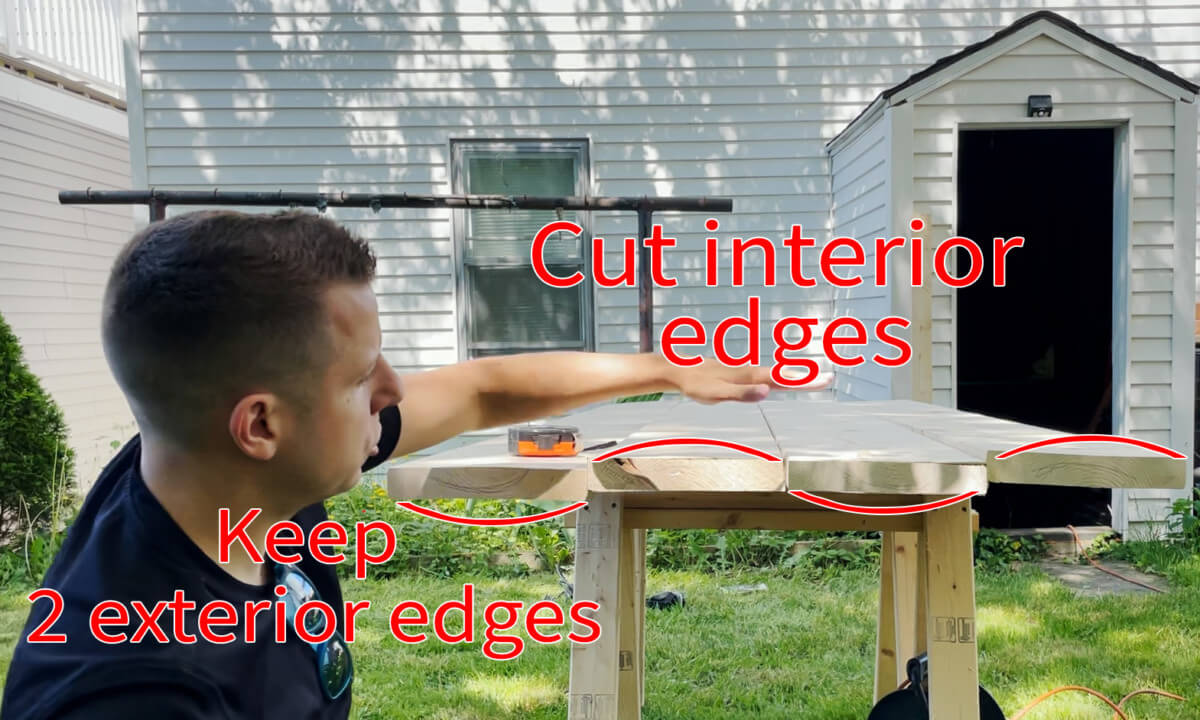
Once you have the boards aligned how they will sit in the final tabletop, mark which edges to cut. You’ll want to cut all edges that will be facing another board that we will later attach. You can keep the two exterior edges intact on the far left and right sides of the table. Repeat this same process for the benchtop boards.
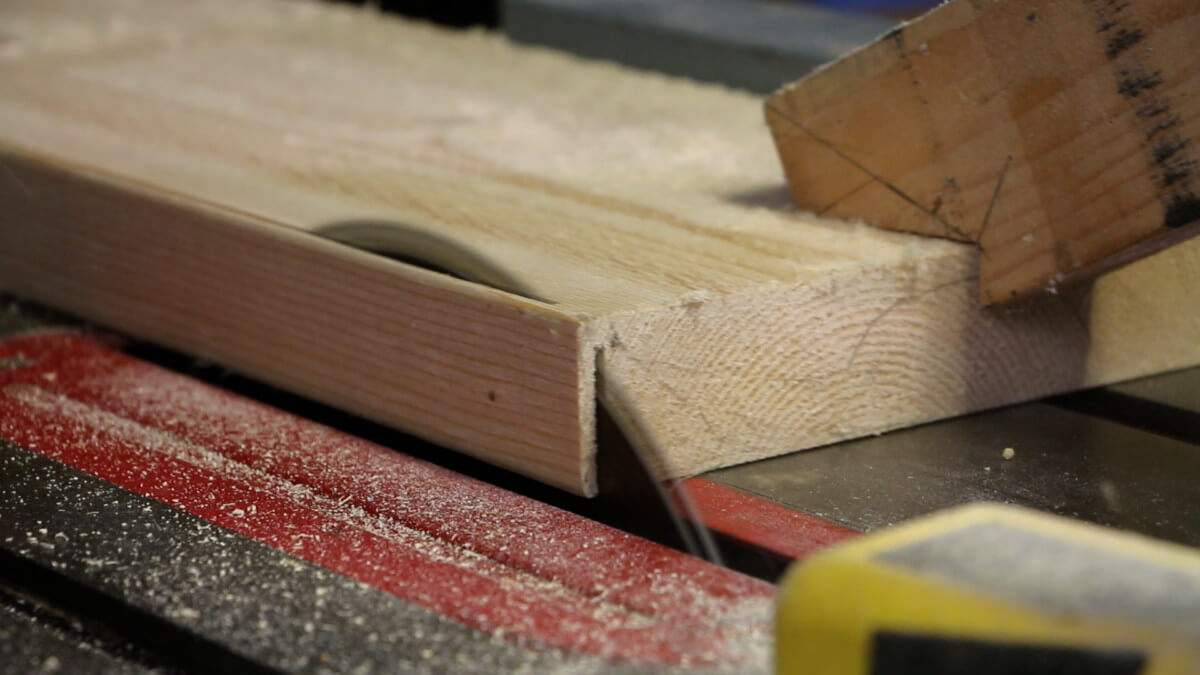
The next step is to use the table saw to rip about a quarter of an inch off of each marked edges on these boards. This will remove the round over that dimensional lumber has so that when the boards are assembled, they will be flush with no gap in between.
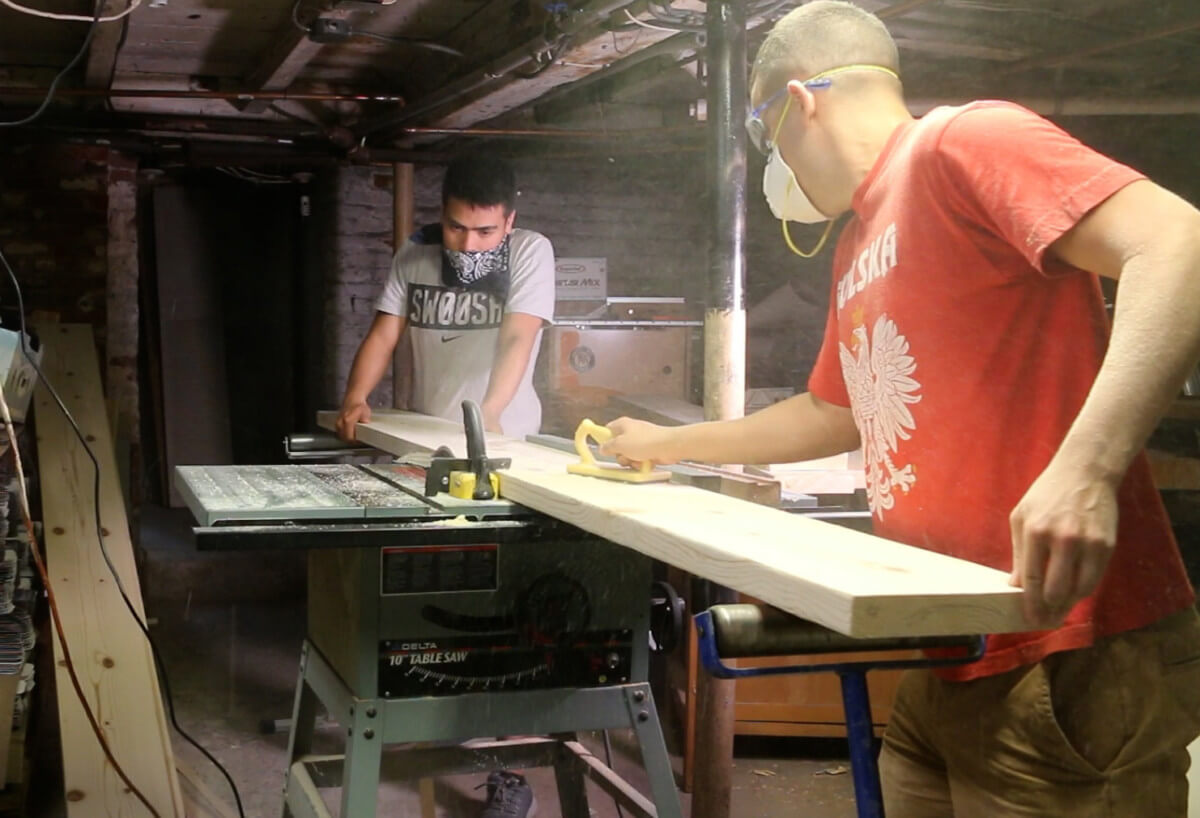
Carefully rip the boards using a secure rip fence as well as feather boards and roller boards to help guide the cut. It really helps having two people for these cuts. Put downward pressure on the board so that it stays flush to the saw table and use a push stick towards the end of the cut.
I recommend keeping all of these boards at their maximum length, as it can be easy to accidentally snipe boards towards the end of a cut. We will cut them to length later once they have been assembled.
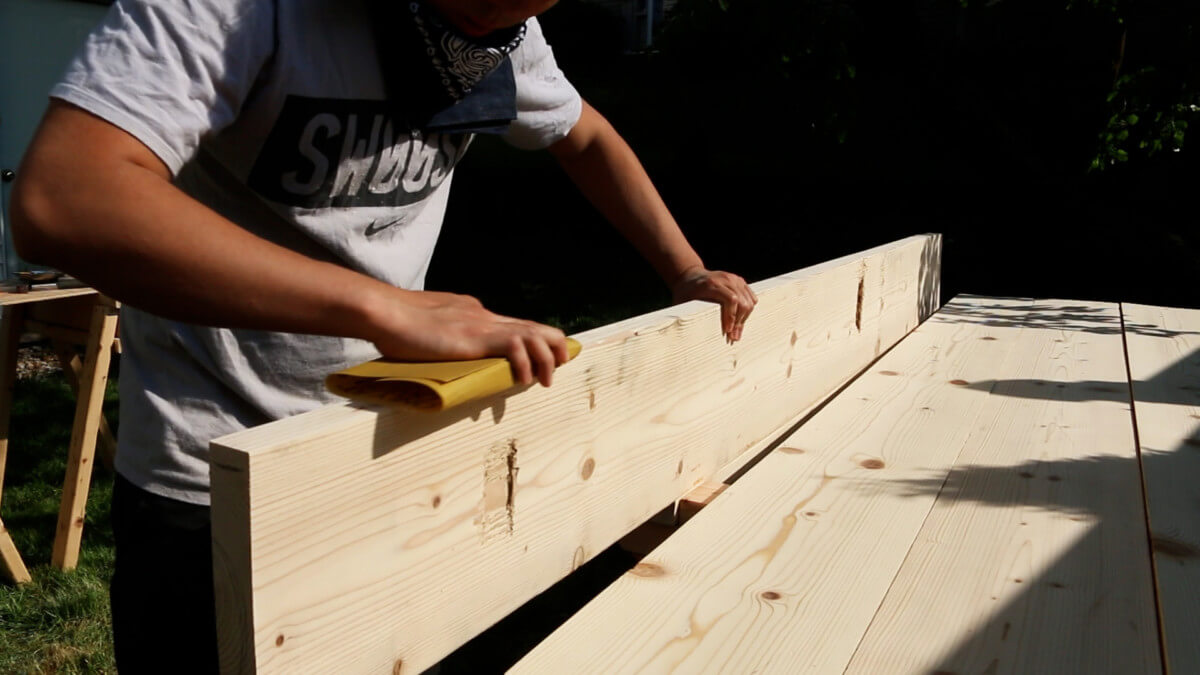
Sanding
Before we start putting anything together, all pieces need to be well sanded. Since we are using dimensional lumber, start at 80 grit. Make sure to hit all surfaces except for the bottoms of the boards that will be the table and bench tops.
Spent the most time making sure that everything is sanded to 80 thoroughly. Then move up the succession. It’s super important to not skip grits here. You must go in order to avoid scratches.
Start with 80 grit on the orbital sander, then move up to 100, 120, 150, 180 and 220 grit. It’s up to you where to stop. Since this is a rustic piece of furniture, I stopped at 100 on most pieces except for the table and bench tops, which were sanded up to 220. You don’t need to spend as much time on successive grits as you did on 80.
Pro tip: Only sand the table and bench tops to 80 grit for now. You will need to sand them again to flatten them later after they are assembled. Once flat, you can move up the sand paper grits.

Assemble the Trestle Table Supports
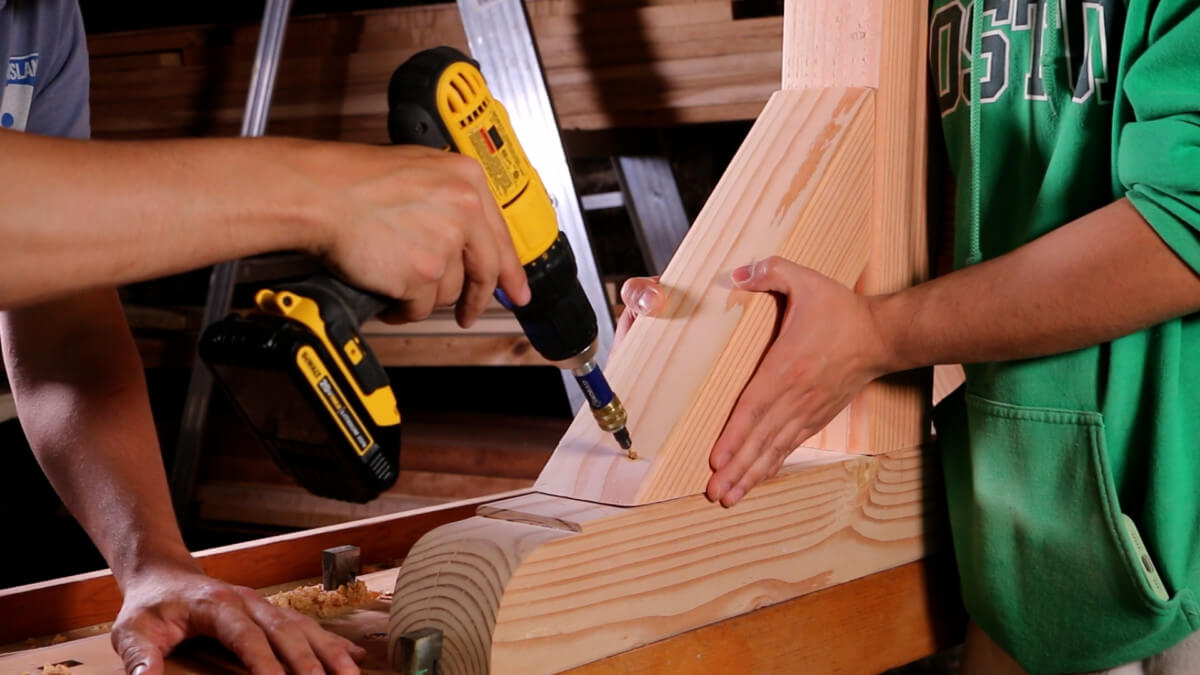
The first part of the assembly is to put together the two large trestle supports for the table. First, lay them out and ensure all cuts are accurate and flush. Note the length of your screws being used and the thickness of the 4×4’s. We will need to drill some holes to countersink the screws so that they have enough wood to grip onto.

We will first assemble the “I” part of this frame, or the non-diagonal pieces.
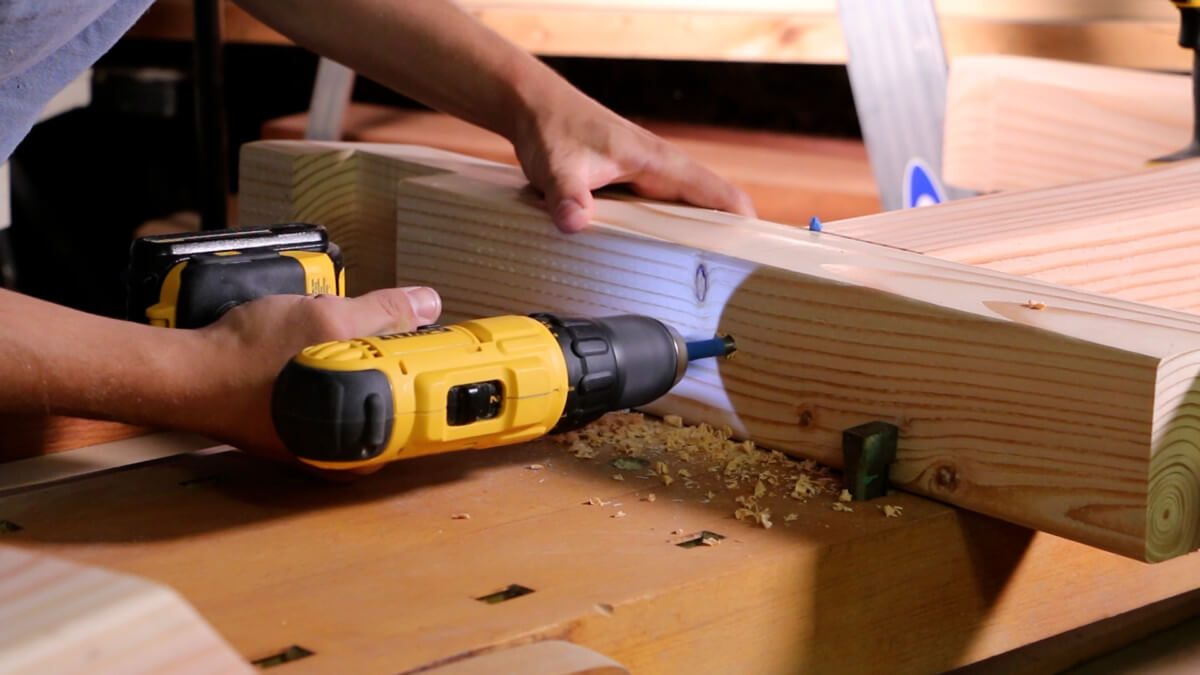
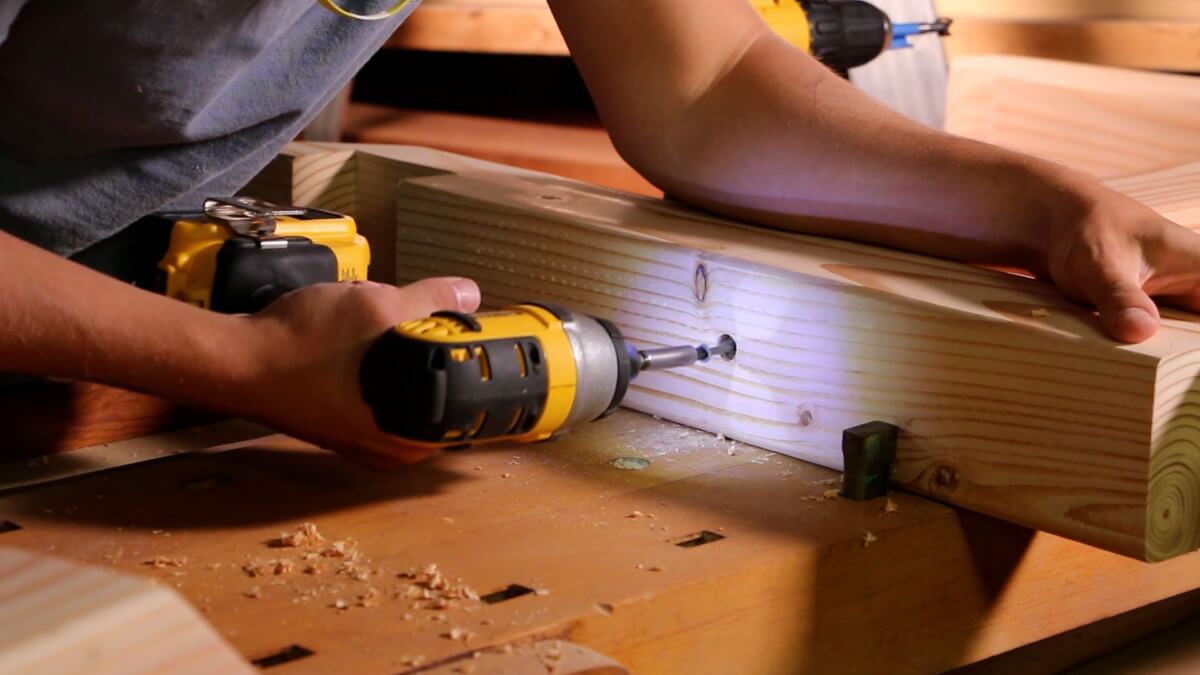
Clamp down the pieces that you want to assemble, using clamps or your trusty woodworking workbench. Then measure how deep to make your countersink, then insert a forstner bit into your drill with masking take on it as a depth gauge. Since our decking screws are 3.5″, and a 4×4 is actually 3.5″ thick, I used about a 1″ countersink depth. Drill 3 holes for two 4×4 connection points of the “I” frame.
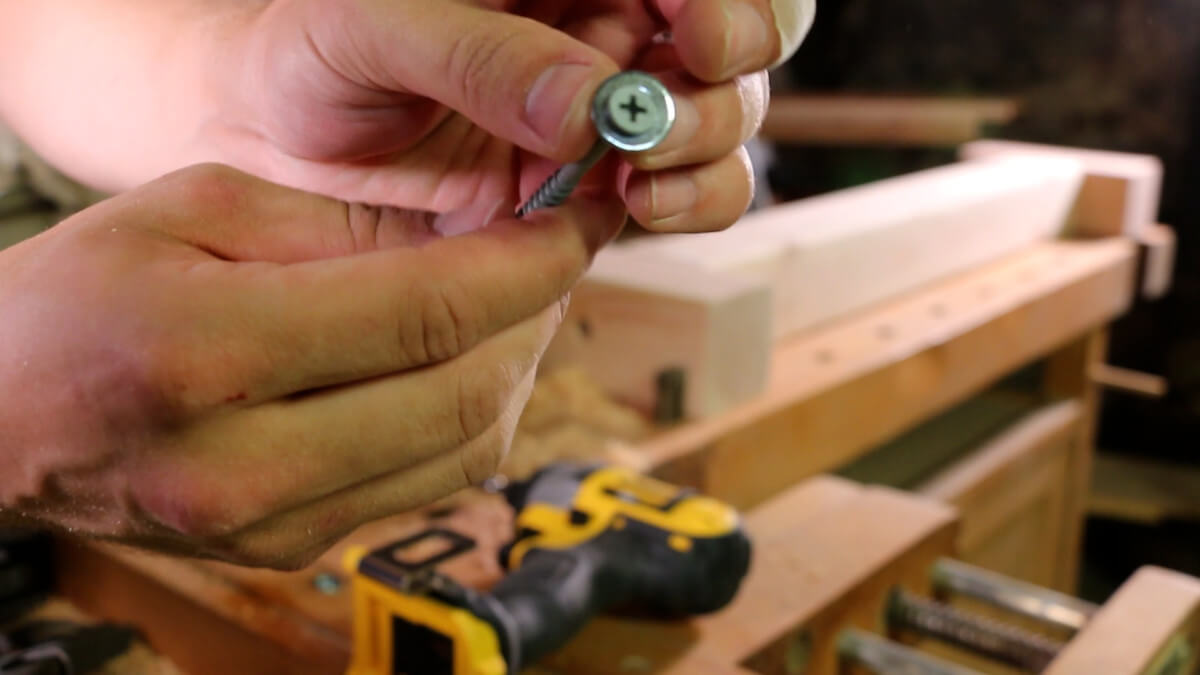
Try adding a small metal washer under each decking screw. It really increases the bite that each screw has, and tightens and strengthens the connections.
Chuck an extension and philips head bit onto your impact driver and then add 3 screws to each of the holes you just made.
Once the “I” frames have been assembled, we can move on to add the four diagonal supports for each frame. Use a simple drill and countersink bit and add two 3.5″ screws at the connection point of each 4×4. Repeat this process for all 8 supports. Have a friend hold them in place while you screw them in, or clamp them to your workbench.
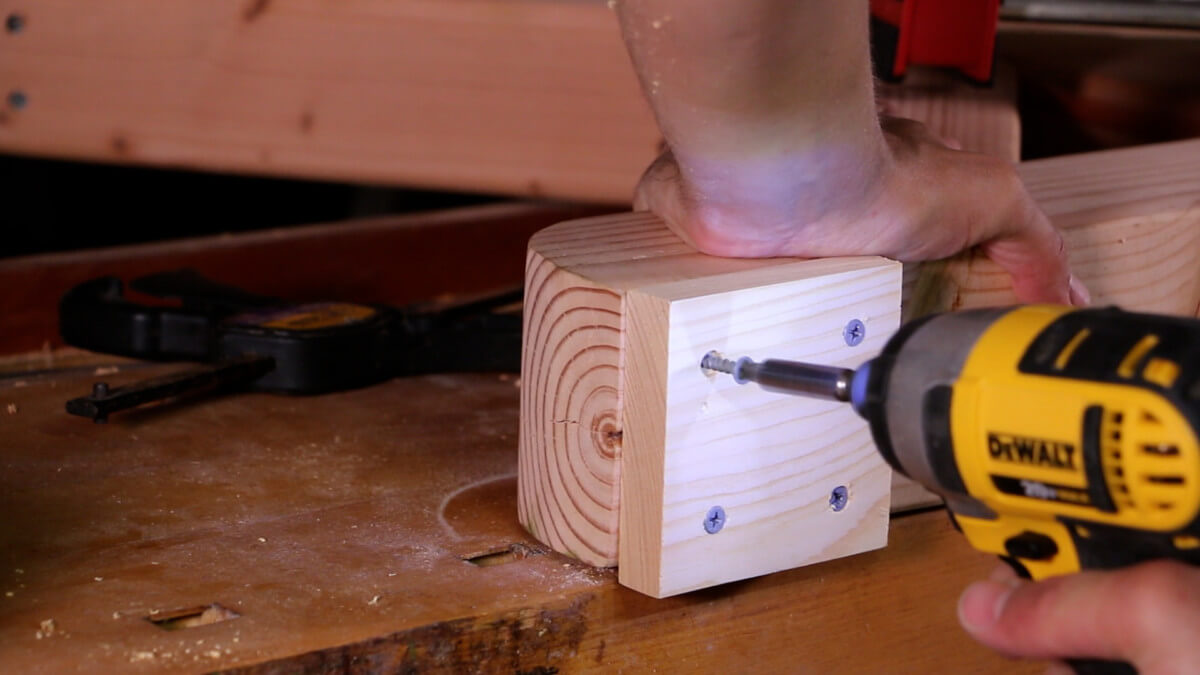
Using the countersink bit and four 1 5/8″ decking screws, attach the 3/4″ thick wood squares to the bottom of the trestle supports. You can repeat this process for the benches now if you’d like to save on setup time.
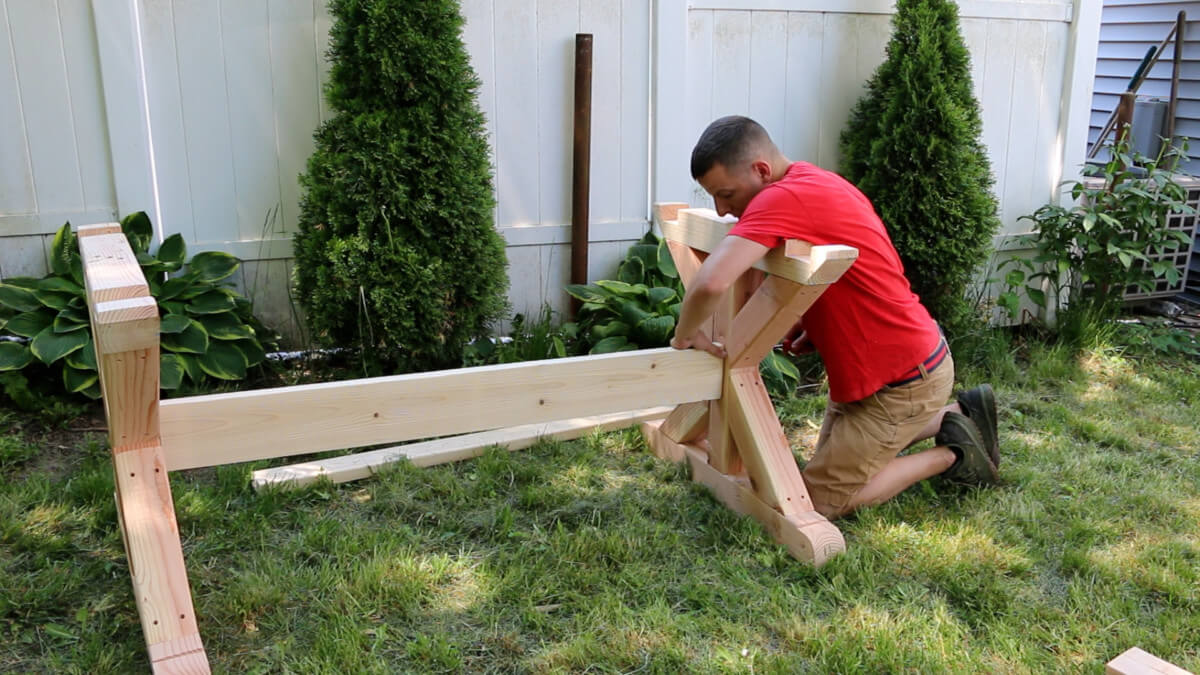
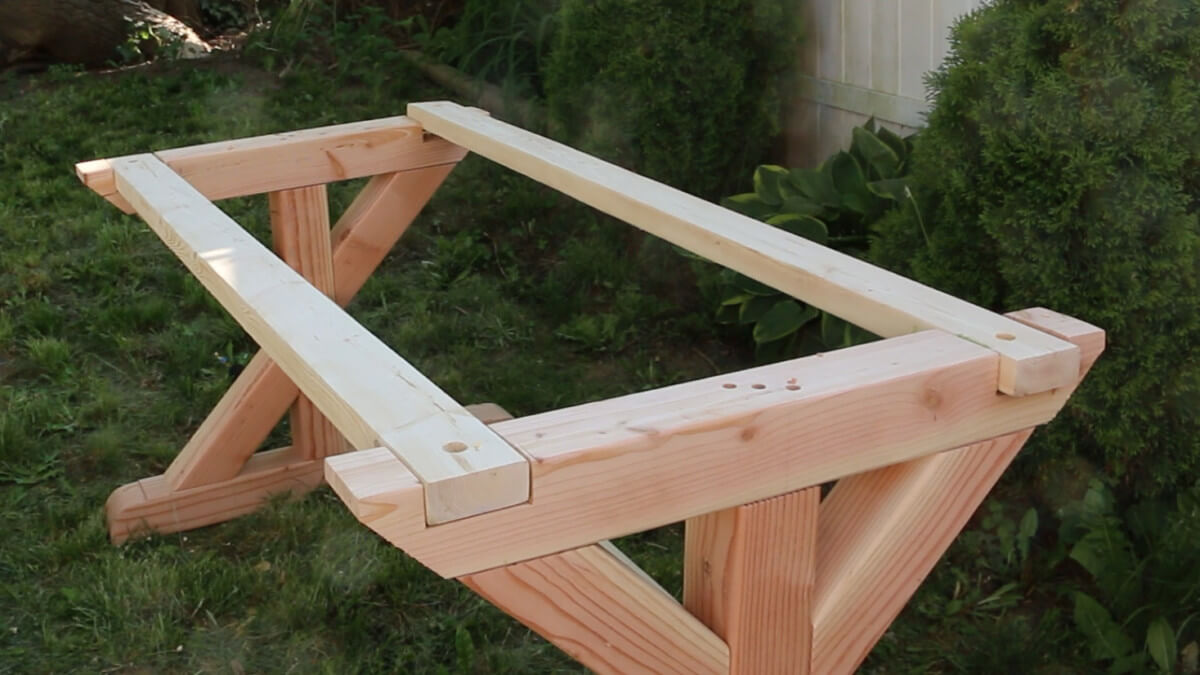
Assemble the Trestle Table Cross Supports
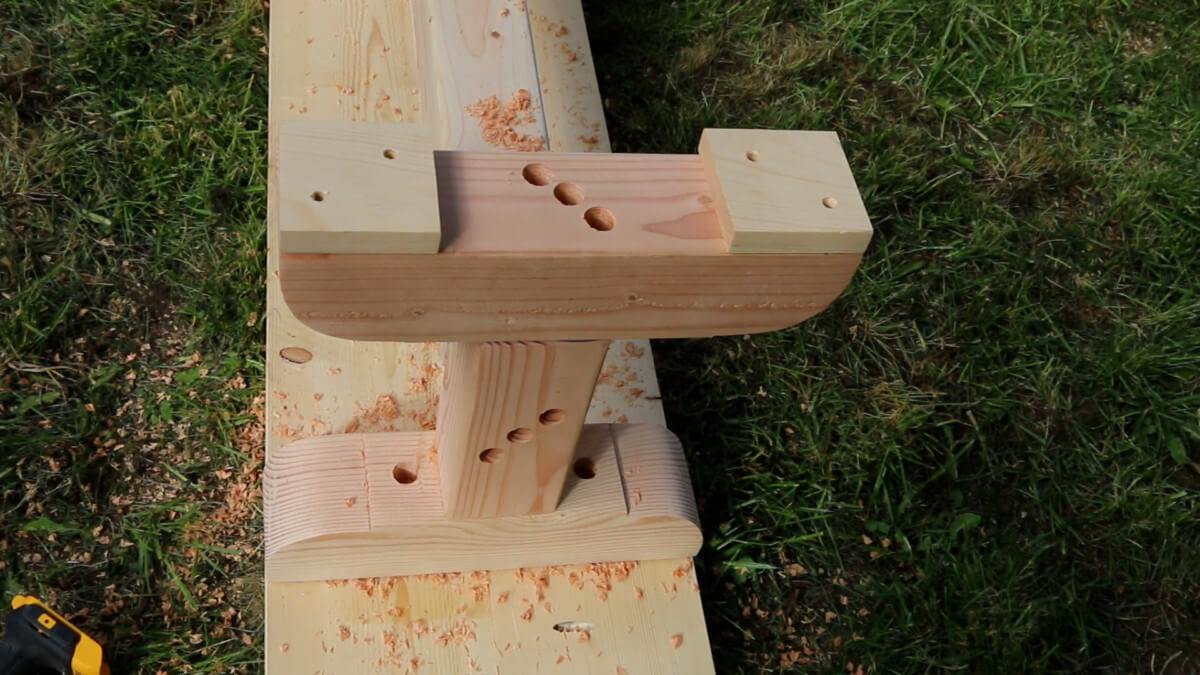
Now we want to get our table to start looking like one! We will measure the height that we want our larger cross support at, and then measure and drill two 3/8″ diameter countersink holes about 1″ deep on the outward facing sides of each trestle support.
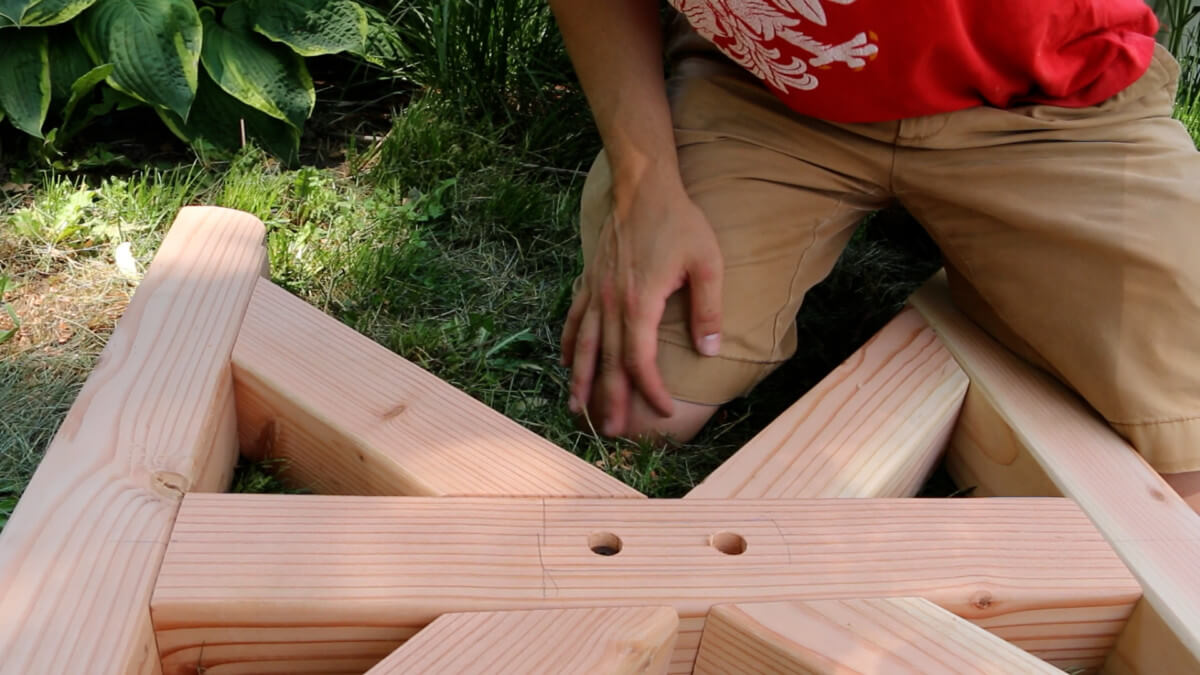
Next, we will attach the cross support using two 3.5″ decking screws and an added metal washer to give some extra strength and grip. Have a friend hold the support level while you screw it in, or use wood blocks to hold it for you. Do this for each side.
If you don’t like the look of the exposed countersink holes, you can use a 3/8 dowel and wood glue to fill them in, cut them flush with a Japanese backsaw and then sand them. The only negative thing about doing this is it would make the table very difficult to take apart and transport.
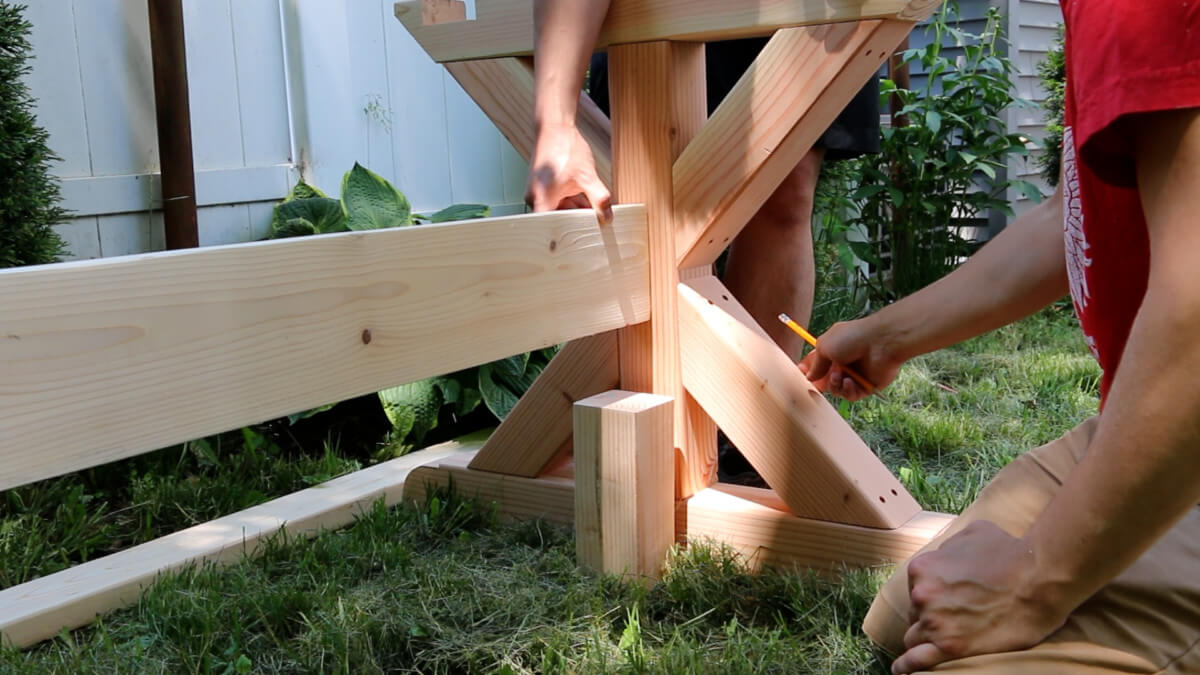
Now, we simply attach the two 2×4’s that fit into the notches on the top and screw them in using two countersunk 1 5/8″ screws on each corner. Check for squareness, and if either board is too long, cut it down so that it will be flush and then attach it.
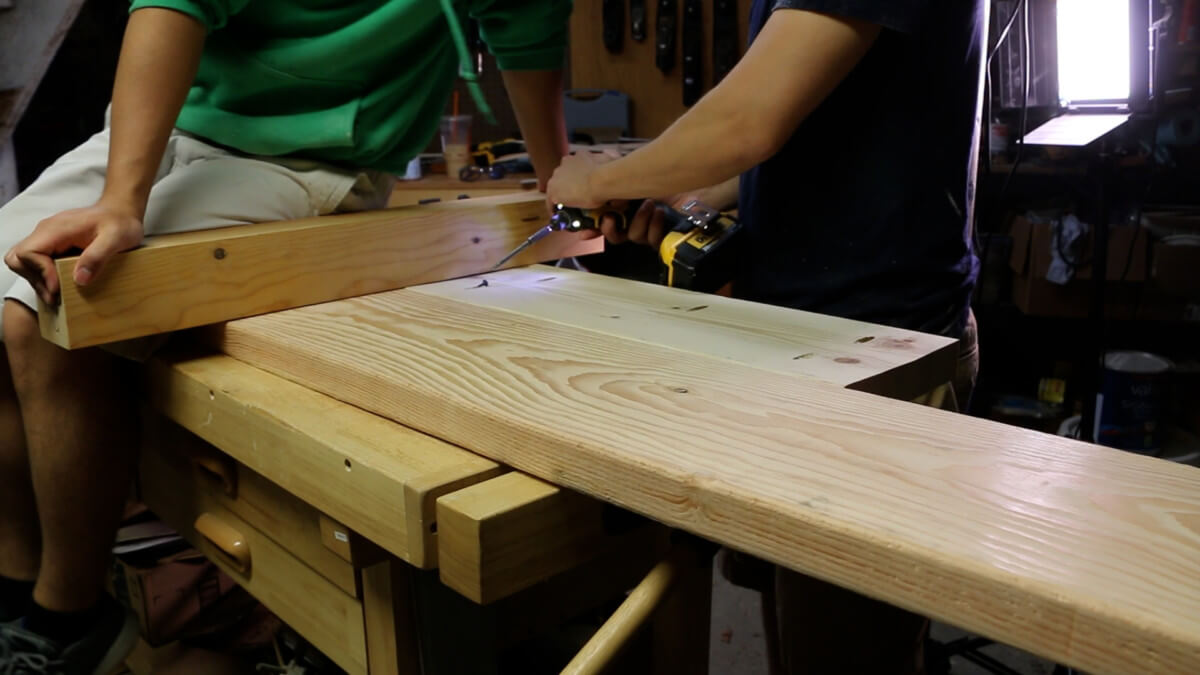
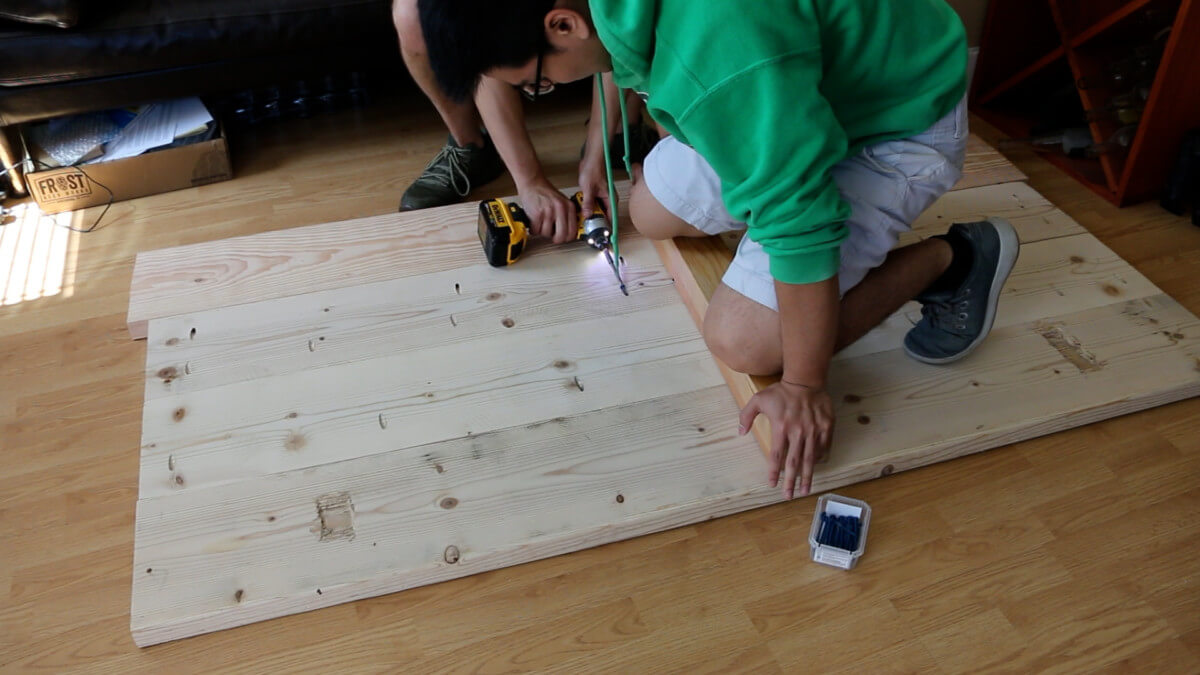
Join the Farmhouse Dining Table and Bench Tops
Before we start joining the table tops together, check the fit and then lightly hand sand all the rough marks from the table saw. We want the board’s edges to fit flush, with no big gaps.
Now we are ready for the moment of truth! It’s time to put the Kreg jig to use and screw the table top together. Carefully set up your jig for 1.5″ thick material and drill holes on what will be the underside the the table. Holes should be about 12 inches apart, and the final hole on each end of the table should be within 4 inches of the end. This will help to keep the table flat and from warping at the ends.

Keep pressure using weights of having someone sit on the table, pushing down on a flat edge, while you screw it together. Alternatively, you can use cauls and clamps.
It is best to do this on a very flat surface such as the top of a workbench, or a flat floor. You want the top of the table to be very flush. You may have to re-adjust some boards if they get crooked.
Repeat this same process for the bench tops.
This build has 4 boards for the table top and I attached them in sets of 2, so that I could put them together on my living room floor, due to their size.
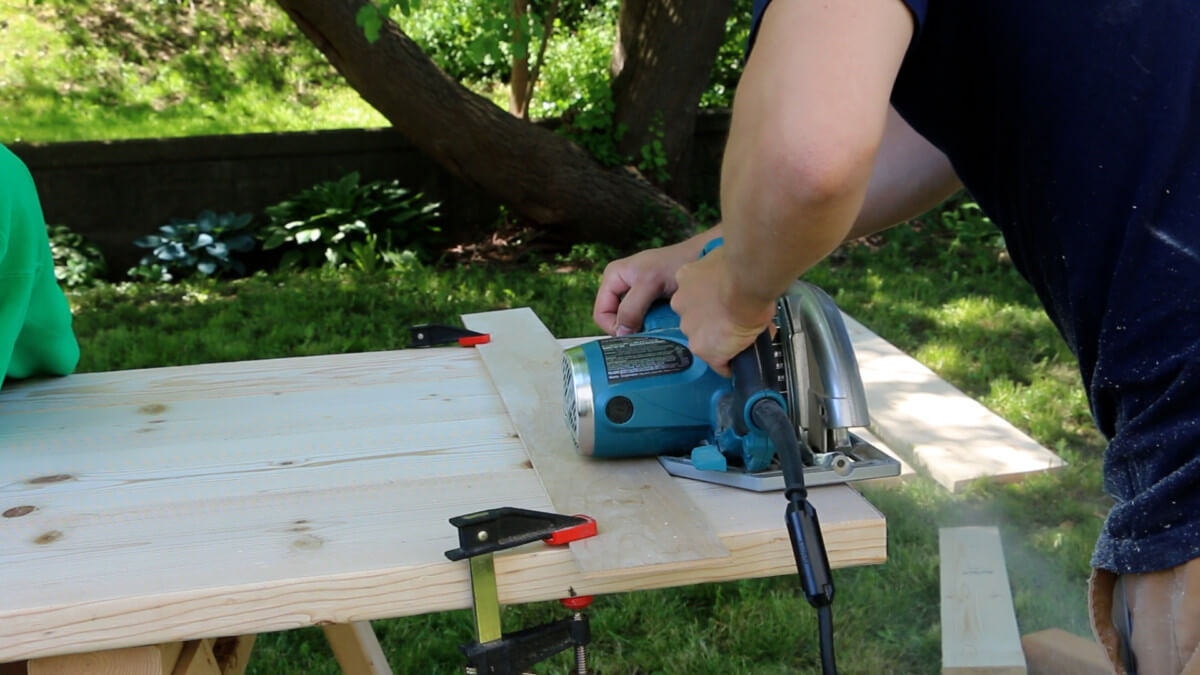
True up the Bench and Table Tops
Once your table and bench tops are solid pieces, put them on some sawhorses and use a square to mark up your desired final length. Clamp a small plywood fence to the boards and crosscut them with a circular saw. Do this for the benches too. Your tops have now taken on their final form.

You can cut the bench tops at the same time with some extra clamps. The last part for the table tops is to sand them flat and up to the grit that you’d like.
Assemble the Benches
The benches go together very similarly to the table trestle support. Make sure to use washers with each decking screw for extra gripping strength. First, I screw together the “i” section of the bench, by clamping it to my workbench and attaching the bench top supports.
Next, I drill four 3/8″ diameter countersinks, two on each leg, to attach the bench top support to the bottom of the bench top. I add a 3.5″ screw and washer to each.
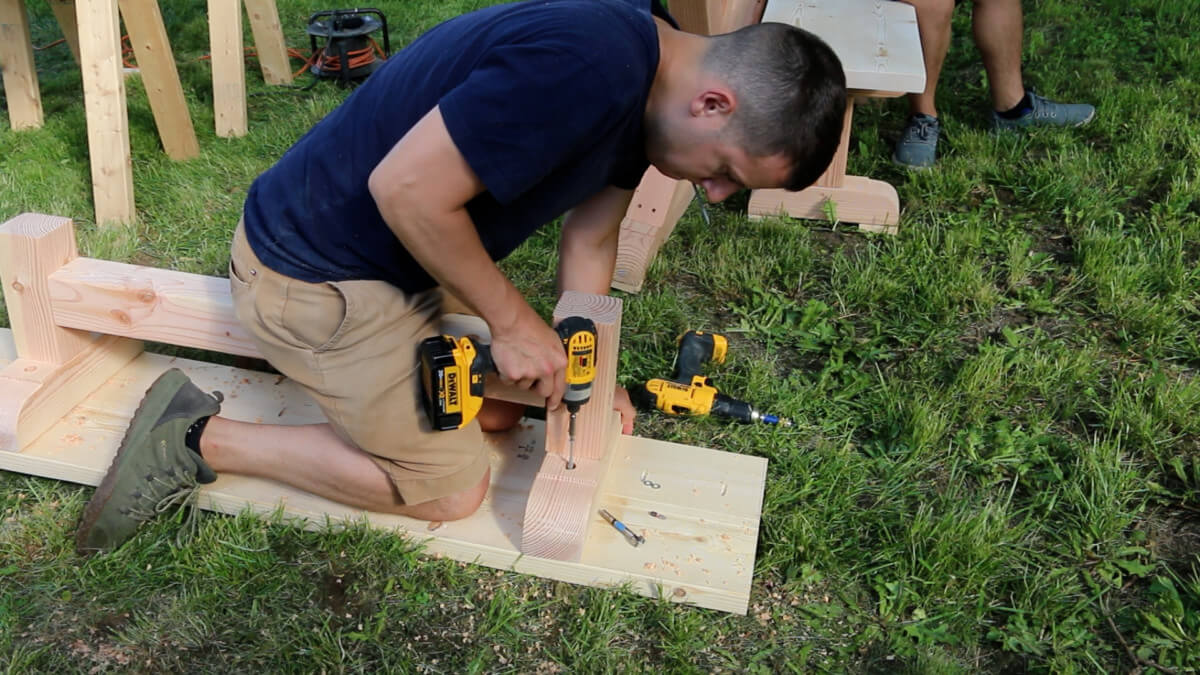
Finally, While sitting on the bench to hold it down, I attach the bench feet with three more countersunk holes and decking screws wish washers.
Finishing and final assembly
Almost there! The last part is finishing. I chose to stain the entire table a darker brown, rustic color. Minwax Jacobean, to be exact. Before the stain, I applied a Minwax wood conditioner, which helped to reduce blotching with the finish. I
applied Two coats of stain and 4 days to fully dry before adding 2 coats of water-based polyurethane, lightly sanded with 600 grit and soapy water between coats for most of the table. It is really important to let the stain fully cure, as otherwise it will react with the water-based topcoat and will never properly harden which cannot be repaired without stripping everything. The same is true for waiting between coats of poly. Read the instructions on your product, but I always err on waiting longer than advised – 1 day/coat.
For the farmhouse dining table and bench tops, I did 5 coats of satin poly, as this is a dinning table after all! The last step was to use 0000 steel wool loaded with paste wax to rub out the poly, on all surfaces.
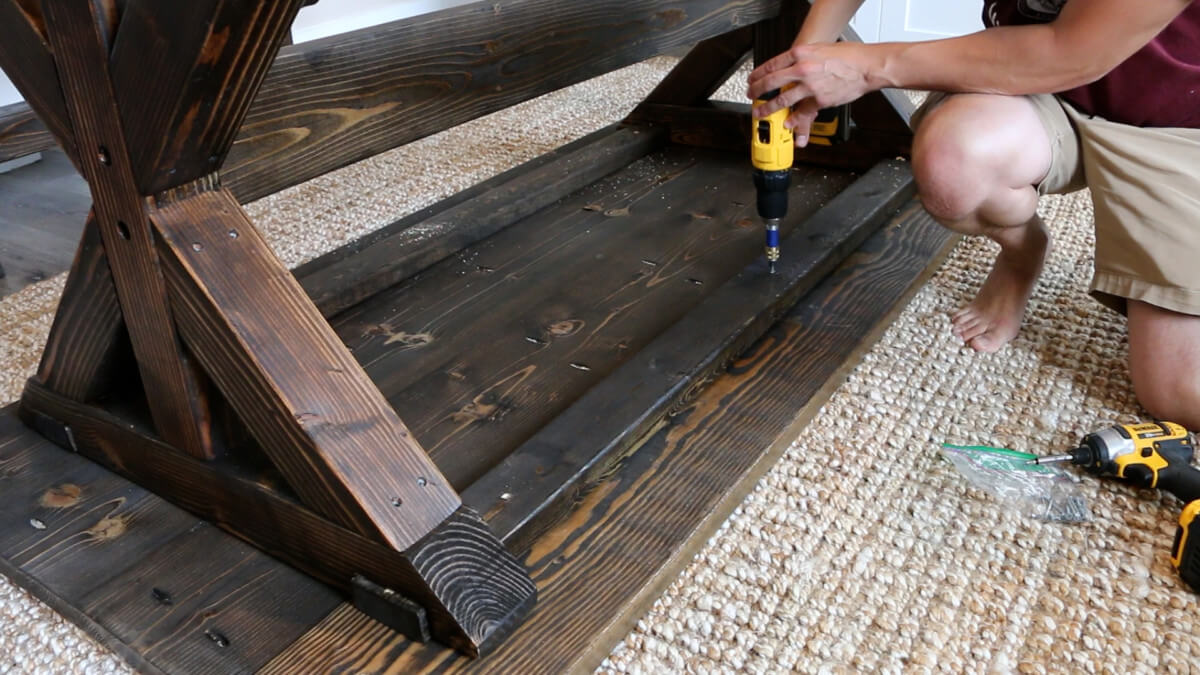
With the finishing done, the last step was to add 8 countersunk 1 5/8″ screws to attach the table top to the top cross supports!
PDF Project Plans
Check here for the downloadable PDF plans for this awesome farmhouse dining table build.
Leave a Reply